Getting Started For the First Time
Gather your equipment. Here's what I use:
• Glass culturing jar (wide-mouth mason quart jar), coffee filter (optional), canning lid ring (optional).
• Plastic mesh strainer (not metal), plastic canning funnel (optional), plastic spoon (optional).
• Miscellaneous glass jars for storage, vis-à-vis wet erase marker for labeling (optional).
1. Pour two cups of milk into the culturing jar. (We use whole cow's milk, but you can use lower fat milk, goat's milk, or even coconut milk. You cannot, however, use Lactaid milk.)
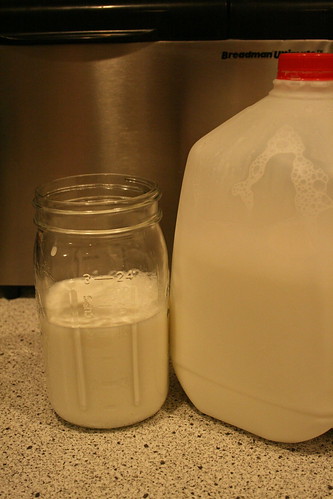
Add 1-2 tablespoons of kefir grains. (You don't need to rinse them or anything, just drain the water off.) Stir gently with the plastic spoon. Cover with the coffee filter, then screw on the lid ring to hold it in place.

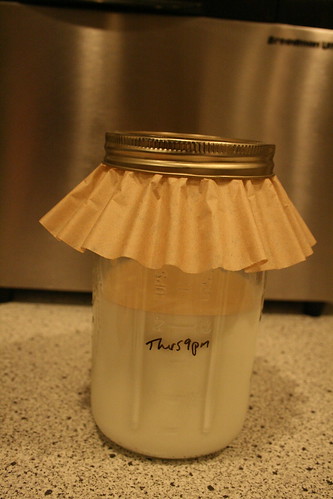
Poke a few holes in the coffee filter with a needle.

(Note: You can just leave the kefir uncovered while it cultures, but I have found that fruit flies like to get into it that way. A coffee filter makes a nice, semi-permeable membrane that keeps the bugs out, but allows air to circulate so you don't get carbonated kefir. I added the needle holes after I got new coffee filters that seemed to "breathe" a little less than my old ones. You may not need the needle holes.)
2. Write the day/time on the culturing jar with a wet erase marker. You'll actually want to gauge the doneness by looking at the kefir, not the clock, but it's a handy guide for knowing when to check on it, and for keeping track of when your grain population needs pruning (more on that below). Stick the jar in a dark cupboard and leave it for about 24 hours; until it is done. You can go back and stir it once or twice a day with the plastic spoon if you'd like.

I look for three things to judge whether my kefir is ready for straining:
a) It smells like kefir,
b) It starts to separate or get little channels of whey throughout it, and
c) It moves as one mass when I tilt the jar slightly.
You'll get to know how sour you like your kefir with time.
Ready for straining:

Daily Routine
The first time you use grains that have been dormant, they may take a little longer to culture your kefir (2-3 days rather than 1-2 days), but once they get going, I like to get into the habit of straining my grains and starting a fresh batch every day at about the same time. This is my daily routine:
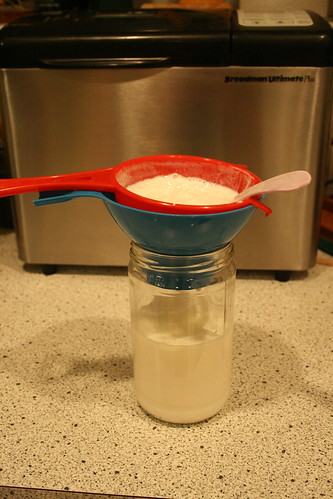
1. When kefir is cultured to your liking, take the lid off and stir it gently with a plastic spoon. Sometimes curds like to accumulate around the grains, and stirring before straining helps loosen things up to make straining easier.
2. Balance your strainer and funnel on top of a storage jar, and pour the cultured kefir through the strainer. To speed things up, you can use the spoon to gently scrape along the mesh to help guide the thicker kefir through the holes.
3. While the kefir is straining, wash and dry your culturing jar. Be careful to dry it very well if you have chlorinated water, because chlorine and kefir grains don't get along very well. Add two cups of fresh milk to your clean, dry culturing jar.
4. Once the kefir has drained completely, you should have a little pile of grains sitting in your strainer. They might still have a little bit of kefir clinging to them, but that's okay, it will just mix into the new batch. Use your plastic spoon to transfer the grains to the fresh milk.

Note: Kefir grains multiply as they culture your milk. After you have been making kefir for a while, you will start to notice two things: 1. The kefir is done too quickly, or is too sour for your liking, and 2. Your little pile of grains keeps getting bigger. When this happens, it's time to prune the grain population. (Details on how to do this below.)
5. Screw a lid onto the finished kefir, label it, and put it in the fridge overnight. (This improves the flavor, increases the nutritional content, and reduces the lactose content.) Screw the coffee filter and lid ring back onto the culturing jar, label it, and put it back into the cupboard.
Uh Oh, I Have Too Many Grains, What Do I Do?
Once your kefir grains get going, they will double in volume approximately every week. You will need to prune the population when this happens. You can do a couple of different things when this happens. (Ranked from easiest to hardest.)
1. Scoop off the extra grains and eat them. (I haven't done this myself, but apparently, they are really, really good for you.) You can also blend them up and add them to a bunch of different recipes. More about this option on Dom's site.
2. Divide your grains between two jars of milk and give one to a friend, along with instructions on what to do when the kefir is done culturing. (Feel free to print this page to give to your friend, if you'd like.)
3. Scoop off the extra grains and rinse them really well in distilled water. Agitate them gently, pouring off and adding new water as necessary until the water stays clear. It might take 5 or 6 tries to get it to this point. Store the grains in a small amount of distilled water in a jar in the fridge. I'm not sure exactly how long they can stay like this, but I know I've kept grains in this "dormant" state for several months, and they still work fine. It might take them a few days to get back to their full potency, but I've never had grains die on me when stored like this. This method is my preferred method of storing extra grains.
Still cloudy, still needs few more rinses:
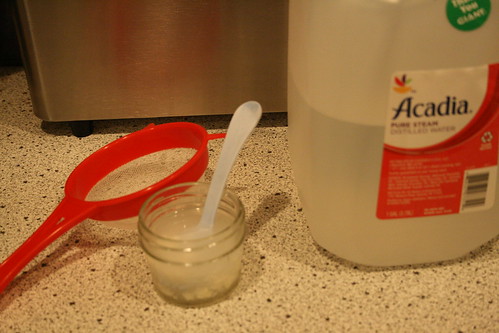
Rinsed and ready for storage:

4. Freeze them or dehydrate them. I have never done either of these, because frankly, I'm just too lazy, but if you'd like to try it, here are Dom's instructions.
Taking a Break
Sometimes, we just can't seem to get through 2 cups of kefir every day, even when we have smoothies every morning, bake kefir-wheat bread and spread kefir cheese on our toast (recipes below). And sometimes, we go away on vacation. And sometimes we just get bored of having the same thing every day.
Well, the good news is that you can take a break from your kefir anytime you want to by just sticking your culturing jar in the fridge. I usually do this right after I do my daily routine - If I put my freshly cultured kefir in the fridge and notice that there are already a couple jars in there waiting to be consumed, I just stick the culturing jar right in there beside them. You can leave it there for up to a week (or even more - you probably won't want to drink the kefir if you leave it for too long, but the grains will likely be okay). When you're ready to start culturing again, just pull it out and leave it in the cupboard overnight. Your kefir will be ready for straining in the morning.
Recipes
Okay, now you have 2 cups of kefir to consume every day, and as hard as you try, you just can't seem to drink it all? I'll confess, I've been making kefir for a couple of years now, and I still don't like the taste of it plain. These are the three things we typically make with our kefir:
Kefir Smoothies
Ingredients:
• 8-10 ounces kefir
• 1 banana
• a couple handfuls of frozen fruit/berries
Directions:
1. Pour kefir into a blender (we use the wide-mouth cup that came with our immersion blender, instead). Add one whole banana. Add enough frozen fruit/berries to bring the level up to 2 cups. Blend well. Share with the kids if you're feeling generous.
Soaked Kefir-Wheat Bread
This bread is our "everyday" bread in our house right now. I made a few variations, but the original recipe can be found here.
Note: You can also halve this recipe quite easily, to make only one loaf of bread.
Ingredients:
• 2 to 3 cups kefir
• 5 cups whole wheat flour (I often replace 1-1.5 cups with ground oats)
• 2 tsp salt
• 2 Tbsp brown sugar
• 2 Tbsp oil
• 1 Tbsp molasses
1. Put 2 cups of kefir in the bread machine bowl. Add remaining ingredients.
2. Turn on bread machine to dough cycle. Watch the dough and add up to another cup of kefir to make it the right consistency (it should feel sticky to the touch, but not stick to your finger - like normal dough).
3. Let dough cycle finish, then unplug the bread machine. Let it sit in the machine for about 24 hours.
4. Punch dough down and knead a few times on a floured surface. Divide dough in half. Press each half into a rectangle to get out air bubbles. Roll into a loaf shape and place in lightly greased loaf pans.
5. Cover and let rise for 3-4 more hours.
6. Preheat oven to 350°. Cut several slashes into the tops of the loaves so they won't crack. Bake for 45-55 minutes, or until they sound hollow when tapped.
7. Remove from pans and allow to cool completely before cutting.

Kefir Cheese
Ingredients:
• some kefir (start with twice as much as you want to have in the end)
Directions:
1. Balance a colander on top of a bowl. Put a coffee filter or cheesecloth inside the colander. Pour in kefir.
2. If desired, cover with plastic wrap and put the whole shebang in the fridge for 8-24 hours.
3. As the kefir sits, the whey will drip away into the bottom bowl, leaving a thicker, slightly less tangy yogurt behind. They call it "kefir cheese", but it's really more the consistency of cream cheese or mayonnaise. You can spread it as-is on toast or bagels, or use it on a sandwich in place of mayonnaise. You can also eat it with a spoon like greek yogurt, maybe with some honey and granola or pureed fruit added to it. (There are many uses for the whey, too. For example, we use it when we soak beans to reduce their gassiness.)
Bonus Recipe! Lemon-Lime Kefir Ice Cream
We don't make this regularly, but everyone gobbles it up when we do. It's a very tasty way to use up extra kefir!
• 3 cups kefir
• 1/2 cup of your favorite sweeteners (we use 1/4 cup honey and 1/4 cup sugar)
• juice of one lemon
• juice of one lime
• zest of one lemon
• zest of one lime
1. Strain the kefir for a few hours (using the technique described above for making kefir cheese) to remove some of the whey.
2. Add honey, sugar, and juices. Blend until well-mixed.
3. Add the zests. Mix well, but don't puree your zest to death. It's nice to keep a few flecks in there.
4. Put it in the fridge for a couple of hours, to get it nice and cold. (My ice cream maker can't handle room temperature ingredients.)
5. Transfer to an ice cream maker, and let the ice cream maker do rest of the work (about 25-30 minutes).
Alternatively: Put it in a freezer-safe bowl and stick it in the freezer. Take it out every hour and stir it. (Warning: the alternate method will take all day, so start in the morning.)
3 comments:
I don't know a thing about Kefir (like what it is or what it tastes like), but if/when we come for Davis camp I'd like to give it a try and if the family likes it I'd gladly take some of your grains off your hand.
It's basically a tangy, drinking yogurt, but it's much less work to make than regular yogurt. I'd love to share when you come visit!
This is a great post! Thanks Jule Ann!
Post a Comment